

The fastest way to create a digital planner is to start with a template, add internal hyperlinks between pages, and export as an interactive PDF for use in GoodNotes, Notability, or Samsung Notes. That three-step sequence, covered in detail below, gets you a working planner in a single session.
Quick workflow: (1) Pick a template in Canva, Kittl, or Adobe Express. (2) Build your page set and link them with a table of contents. (3) Export as an interactive PDF.
Before you open any tool, confirm you have these minimum deliverables:
- A cover page and a year-at-a-glance overview
- Monthly grid template (duplicated for each month)
- Weekly and daily layout pages
- A table of contents with working hyperlinks to each section
Key Takeaways
A template-first build with internal hyperlinks and interactive PDF export is the fastest path to a working, sellable digital planner.
| Point | Details |
|---|---|
| Start template-first | Use Canva, Kittl, or Adobe Express to build pages quickly from existing planner templates. |
| Hyperlinks are non-negotiable | Add TOC-to-month-to-day navigation and test every link before export. |
| Export as interactive PDF | Enable “PDF with links,” embed fonts, and compress images to keep file size manageable. |
| Test on real devices | Open the final PDF in GoodNotes, Notability, and Samsung Notes before publishing any listing. |
| Zemssolutions bundles speed launch | Ready-made PLR/MRR template bundles from Zemssolutions cut design time and include commercial use rights. |
Table of Contents
- Which tool should you use to create a digital planner?
- How to design your digital planner step by step
- How do you add hyperlinks and navigation to a digital planner?
- What export settings work best for GoodNotes, Notability, and Samsung Notes?
- Where do you find templates and assets you can legally sell?
- How do you list and sell a digital planner online?
- Free vs. paid tools: what does it actually cost to build a planner?
- Legal considerations when selling digital planners
- Why device-first testing cuts refunds more than any other single step
- Zemssolutions template bundles get you to a finished planner faster
- Sources
Which tool should you use to create a digital planner?
Three categories cover almost every creator’s needs. Choosing the wrong one wastes hours, so match the category to your actual skill level and timeline.
Template-first web makers (Canva, Kittl, Adobe Express) are the right starting point for most people. Canva offers hundreds of planner templates, a drag-and-drop editor, and PDF export with links. Kittl leans toward decorative aesthetics and is popular for ornate covers. Adobe Express sits between the two, with tight integration into the broader Adobe ecosystem. All three are free to start, with paid tiers that unlock premium assets. For a third-party feature breakdown of Adobe Express, Toolsplorer’s Adobe Express review covers pricing and limitations clearly.
Slide and presentation apps (Apple Keynote, Microsoft PowerPoint, Google Slides) give you more layout control than web makers and handle hyperlinks natively. Keynote on iPad lets you design and test on the same device you’ll use for annotation. PowerPoint’s PDF export preserves links reliably. Google Slides is free and collaborative, though its PDF link export can be inconsistent across versions.
Pro page-layout apps (Adobe InDesign, Affinity Publisher) are built for print-quality layouts and give you precise control over margins, master pages, and typography. The learning curve is steep, but if you plan to sell at volume or need pixel-perfect grids, the investment pays off. Affinity Publisher is a one-time purchase, which makes it the better long-term value for creators who want to avoid subscriptions.
| Capability | Template-first makers | Slide/presentation apps | Pro layout apps |
|---|---|---|---|
| Built-in planner templates | Yes, extensive | Limited | Rare |
| Internal hyperlink support | Yes (Canva, Express) | Yes | Yes |
| Interactive PDF export | Yes | Yes (PowerPoint, Keynote) | Yes |
| Built-in asset libraries | Large | Moderate | Minimal |
| Mobile editing | Yes | Partial | No |
| Cost shape | Free → subscription | Free → one-time/subscription | Subscription or one-time |
How to design your digital planner step by step
A full creator workflow runs from niche selection through listing and promotion. Here’s the practical build sequence.
- Define your niche and page inventory. A specific planner (ADHD-friendly weekly layout, marathon-training log, entrepreneur quarterly review) sells better than a generic undated one because it solves a precise problem. List every page type before you open a design tool.
- Set your page size. For iPad use, 8.5" × 11" (letter) or 210 × 297mm (A4) both work. For a square layout that fits most tablets without cropping, 2480 × 3508px at 300 DPI is a reliable standard. Landscape orientation suits split-screen annotation workflows.
- Build a master layout. Set consistent margins (at least 0.5" on all sides), a safe zone for tab navigation along one edge, and a grid that aligns all elements. Consistent spacing across pages makes the planner feel professional and reduces annotation errors.
- Design each page type. Core pages to include: cover, year at a glance, monthly grid (×12), weekly two-column spread, daily schedule, habit tracker, notes pages, and a sticker/element sheet. Keep the visual style identical across all pages.
- Duplicate, don’t redesign. Once your monthly template is right, duplicate it eleven times and update the month label. Same for weekly and daily pages. This is where templates save the most time.
- Apply consistent typography and color. Use a minimum 14pt font for body text so it remains readable on a 10" tablet screen. Tap targets (buttons, tabs, links) should be at least 44×44px. Maintain a color contrast ratio of at least 4.5:1 between text and background for accessibility.
Pro Tip: Design your weekly and daily pages first. They get the most use, so getting them right before duplicating saves you from fixing the same error across dozens of pages.
Page types to include in a complete planner:
- Cover and title page
- Year-at-a-glance calendar
- Monthly grid (one per month, with navigation tabs)
- Weekly two-column layout
- Daily schedule with time blocks
- Habit tracker
- Blank notes pages
- Sticker or element sheet for decoration
How do you add hyperlinks and navigation to a digital planner?
Interactive navigation is what separates a digital planner from a static printable. Without working links, buyers can’t jump between sections, and the planner is no better than a printed PDF.
The standard navigation pattern is: TOC → month → week → day, with persistent tabs on every page that link back to the TOC or the current month. Every page should also carry a “home” or back button.
How to add links in most tools:
- Select the element you want to act as a button (a tab, a text label, a shape).
- Set a hyperlink target pointing to the destination page number.
- Verify the page numbers in your export match the link targets (reordering pages after linking breaks everything).
- Export as an interactive PDF and open it in your target app to confirm each link fires.
The digital-planner-generator project on GitHub demonstrates this structure in production: hyperlinked tabs, year/month/week/day views, and PDF generation via pdf-lib. It’s a useful reference for anyone who wants to understand the technical requirements behind a working navigation system.
Testing checklist before you publish:
- Every TOC link lands on the correct month page
- Month tabs on weekly pages return to the correct month grid
- Back/home buttons work from daily pages
- No links point to blank or deleted pages
- Test on at least two different apps (GoodNotes and Notability on iPad; Samsung Notes or Xodo on Android)
Pro Tip: Save a separate “QA build” of your planner before final export. If a link breaks during testing, you can fix the source file without starting over. Test on a physical device, not just a desktop PDF viewer — link behavior differs between apps.
What export settings work best for GoodNotes, Notability, and Samsung Notes?
A hyperlinked PDF that opens cleanly in GoodNotes is what buyers expect. Getting the export wrong is the single fastest way to generate refund requests.
Page size and resolution: Export at 300 DPI for crisp rendering on Retina and high-DPI Android displays. Letter (8.5" × 11") and A4 both import cleanly into GoodNotes and Notability. Avoid non-standard sizes unless your niche specifically requires them.
Export checklist:
- Select “interactive PDF” or “PDF with links” in your export settings
- Embed all fonts (prevents text rendering issues on other devices)
- Flatten transparency layers to avoid rendering artifacts in annotation apps
- Compress images to JPEG quality 80–85% to balance file size and sharpness
- Deliver as a single PDF file, not a ZIP, for the smoothest import experience
App compatibility notes:
| Feature | GoodNotes | Notability | Samsung Notes |
|---|---|---|---|
| Internal PDF hyperlinks | Supported | Supported | Supported |
| Annotation over PDF | Yes | Yes | Yes |
| Custom page size import | Yes | Yes | Limited |
| Sticker/image import | Yes | Limited | Yes |
Planners with many high-resolution images can exceed 100MB, which causes slow imports and occasional crashes. If your file is large, offer a “lite” version with compressed images alongside the full-resolution download. Reviewers of popular annotation apps consistently flag GoodNotes, Notability, Xodo, and Samsung Notes as the primary test targets for planner compatibility.
Where do you find templates and assets you can legally sell?
Sources matter as much as design skill when you plan to sell. Using a font or graphic without a commercial license can result in a DMCA takedown or a forced product removal.
Asset sources to use:
- Canva’s built-in library (check each element’s license — Canva Pro elements carry a commercial license for digital products; free-tier elements may not)
- Google Fonts (all fonts are open-source and free for commercial use)
- Font Squirrel (filters specifically for commercial-use fonts)
- Creative Fabrica and Design Bundles (graphic packs with explicit commercial licenses)
- Your own original illustrations or icons (zero licensing risk)
What to check in any license file:
- Does it permit use in digital products for resale?
- Is there a per-unit or per-sale cap?
- Does it allow sublicensing (relevant for PLR/MRR products)?
Pro Tip: Bundle a one-page quick-start PDF with every planner download. List the file names, supported apps, and how to import. Buyers who can’t figure out how to open the file leave negative reviews — a quick-start guide prevents most of that.
PLR (Private Label Rights) and MRR (Master Resell Rights) templates let you sell a product without designing from scratch. The tradeoff: many sellers use the same base, so differentiation comes from your customization, niche targeting, and listing quality. Original designs carry no such limitation and tend to command higher prices.
How do you list and sell a digital planner online?
The full prelaunch checklist covers file naming, license clarity, pricing strategy, delivery testing, and support links. Here’s the condensed version.
- Write a clear product title. Include the planner type, supported apps (GoodNotes, Notability), and the year or format (undated, 2026). Example: “Undated Weekly Digital Planner — GoodNotes & Notability Compatible.”
- List every file in the description. Buyers want to know exactly what they’re downloading before they pay.
- Add device mockups. A flat PDF thumbnail converts poorly. A mockup showing the planner open on an iPad in GoodNotes converts far better. Short screen-recording videos showing navigation in action are the highest-impact marketing asset for planner listings.
- Set a refund policy and state it clearly. Digital downloads are typically non-refundable, but you must say so explicitly in the listing.
- Price to signal quality. Entry-level planners on Etsy typically start around $5–$8. Niche-specific or heavily designed planners with multiple page types can justify $15–$30. Bundles (planner + sticker pack + bonus pages) support higher price points.
Distribution options:
- Etsy: High discoverability, built-in buyer trust, but platform fees and algorithm dependency. Good for launching and validating demand.
- Sellfy: Clean storefront, instant downloads, no listing fees. Better margin per sale once you have traffic.
- Your own site: Full customer ownership. The WordPress + Easy Digital Downloads workflow covers the full setup: install EDD, connect Stripe or PayPal, upload files, and test checkout and delivery end-to-end.
For promotion, Pinterest and TikTok are the highest-ROI channels for planner sellers. Pinterest drives long-tail search traffic for months after a pin goes live. TikTok screen recordings showing the planner in use convert well because buyers can see exactly how navigation works before purchasing.
Free vs. paid tools: what does it actually cost to build a planner?
The honest answer is that you can build a functional planner for $0 using Canva’s free tier, Google Slides, or Keynote (included with Apple devices). The real cost is time, not software.
Canva Free gives you access to hundreds of templates and basic PDF export. Canva Pro ($15/month) unlocks premium elements, brand kits, and background removal. For most planner creators, the free tier is enough to launch a first product. A detailed Canva feature breakdown covers what’s actually gated behind the paid tier.
Affinity Publisher is a one-time purchase (currently around $70), making it the most cost-effective pro option for creators who want InDesign-level control without a monthly subscription. Adobe InDesign runs on a Creative Cloud subscription ($22.99/month as a single app).
The hidden cost most beginners miss is asset licensing. A font pack with a commercial license typically runs $10–$40. A graphic bundle with commercial rights can run $15–$60. Budget $50–$100 for assets if you’re building an original design from scratch. PLR template bundles reduce that cost significantly, though they introduce the differentiation tradeoff described above.
Legal considerations when selling digital planners
Beyond font and graphic licensing, three legal areas catch new sellers off guard.
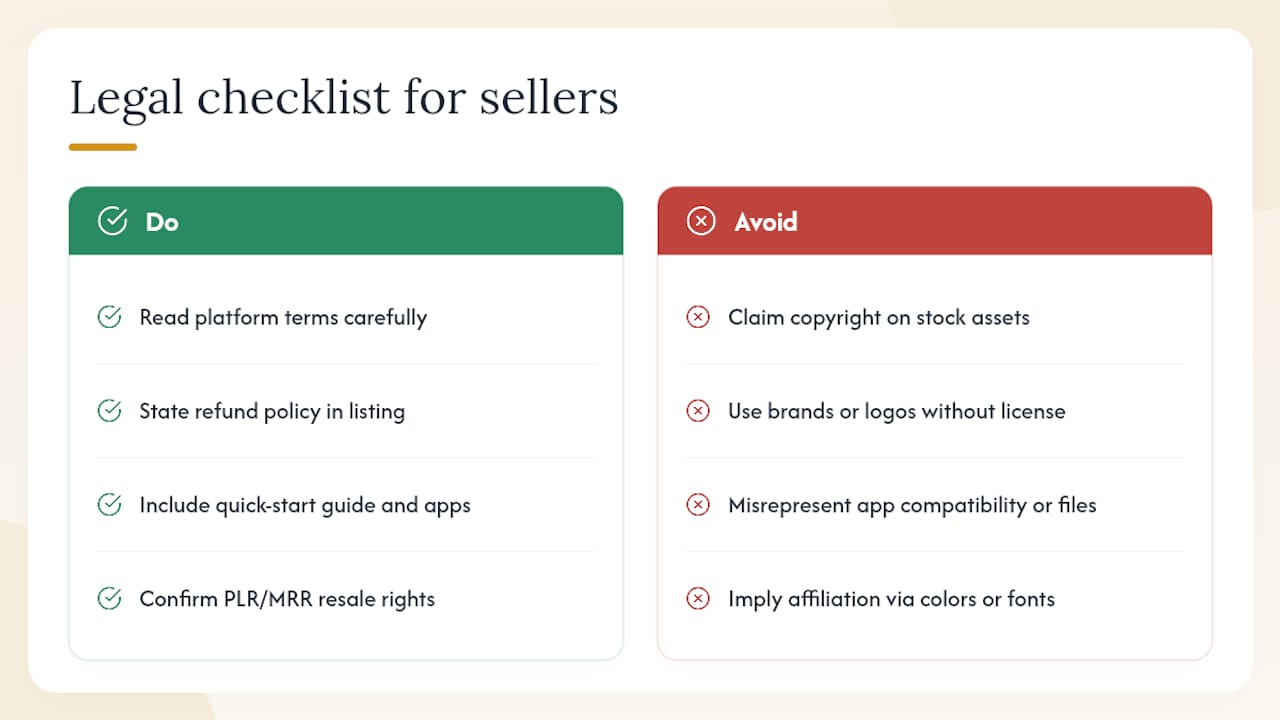
Copyright ownership. When you design a planner using a template platform, read the platform’s terms carefully. Canva, for example, grants commercial use rights for designs created on its platform, but you cannot claim copyright over Canva’s stock elements themselves. Your original arrangement and custom elements are yours; the underlying stock assets are not.
Refund policies. Digital downloads are generally non-refundable under U.S. consumer law because the buyer receives the file immediately. However, if your listing is misleading (wrong app compatibility, missing files), a chargeback is likely. The safest approach: state your refund policy explicitly in the listing, include a quick-start guide, and list every supported app. This is not legal advice; consult a qualified attorney for your specific situation.
Trademark and design infringement. Avoid using brand names, logos, or copyrighted characters in planner designs unless you hold a license. This includes popular TV show themes, sports team colors used in a way that implies affiliation, and font names that are trademarked. Etsy and Sellfy both respond to DMCA takedown requests, and a removed listing costs you ranking history.
If you sell PLR or MRR products, confirm the original license explicitly permits resale and sublicensing. Some PLR licenses restrict the number of copies you can sell or require you to modify the product before resale.
Why device-first testing cuts refunds more than any other single step
Most digital planner refund requests trace back to one problem: the buyer couldn’t open the file or the links didn’t work in their app. Not a design flaw. Not a pricing issue. A compatibility gap the seller never tested.
The fix is straightforward. Before you publish any listing, open the exported PDF in GoodNotes, Notability, and at least one Android app (Samsung Notes or Xodo). Tap every link. Scroll through every page. If a tab doesn’t fire or a page is blank, fix it in the source file and re-export. That 20-minute test session eliminates the majority of post-sale support tickets.
Clear listing copy does the rest. State the supported apps in the title, not buried in the description. Include a quick-start PDF in the download. Buyers who know exactly what they’re getting and how to use it don’t leave negative reviews.
Zemssolutions template bundles get you to a finished planner faster
Building a planner from a blank canvas takes longer than most creators expect. Zemssolutions offers ready-made template bundles that skip the blank-page problem entirely, with consistent styling, built-in assets, and sales-ready page structures.
The 700+ Notion Templates Bundle with PLR & MRR gives you a deep library of productivity and planner page structures you can adapt directly into a digital planner product. For creators focused on finance, the Budget Planner shows exactly how a niche planner product is packaged, priced, and presented. If you need marketing assets alongside your planner, the 8,400 Canva Social Media Templates Bundle covers mockups, promotional graphics, and social content in one download.
All Zemssolutions products come with commercial use rights, so you can adapt, brand, and sell without starting a licensing audit from scratch. Browse the full library at Zemssolutions and pick the bundle that matches your planner niche.
Sources
These are the primary references behind the technical and selling guidance in this article.
- How To Create & Sell Digital Planners (A Guide For Creators)
- mohanrex/digital-planner-generator
- Sell digital planners online - Quickshops
- How to Sell Digital Planners on WordPress